Saturday, 27 October 2007

The Gel-coat...


We now had the shiniest boat on the planet and that could only mean one thing...

It was time to apply the Gel-coat.........this is the layer that will eventually become the finished surface because when you make a mold you are actually creating something ...inside out...

If you follow that...?

The Gel is mixed with a pigment this will give you the colour you desire...so what you see in the bucket is what you get....no going back.!

Paint it on with a brush.......

Two more coats were applied over the next 24 hours...

Friday, 26 October 2007

Laying on the GRP...


Having finished the Gel-coat the next step is to apply the fibre glass which gives your boat it's strength....


The fibre glass comes on a roll and is known as ...chopped strand matt...


Get your gloves on...you will get many splinters...Be warned...even if you only look at it...it will come and get you...keep a pair of tweezers handy...


The matt is cut to length and laid on the hull....apply your resin with a roller...this then holds the matt in place...


When the matt is wetted out...the process of removing the air bubbles from under the matt begins....


A roller with washers threaded on it used the roll and squeeze the air bubbles out of the matt...


If the bubbles are'nt removed, the final finish will be ruined....great care must be taken at this stage .....because it won't be seen until the boat is removed from the mold...


Only one layer is applied at first... we then left it overnight before applying another two layers....and then again overnight before laying on the last two...


....5 layers were used as this is a mold we are making....for any further boats created 3 will be sufficient...


Laminating done.........only for the moment...


Drink beer and go to bed...


Thursday, 25 October 2007

Mold hull support...


The nature of the planks overlapping on a Clinker built boat give it strength...but on the mold more support is required to keep it straight and rigid..


For this we obtained some lengths of gutter...these were almost cut through every 3-4 inches with a hacksaw...leaving just a sliver holding them together...these were glued to hold them in place...


We also added a quadrant section along the back of the flange...


This was also partially cut through and glued in place...


Wednesday, 24 October 2007

More laminating...


Straight away we laminated over the plastic gutter pipe...this box section when covered in GRP would make the mold stiff...


The flange and quadrant were also covered with GRP....


This will give support when levering a boat out of the mold...


Believe it or not....but the mold is made...this call's for a beer!


We took a break from the project for a couple of weeks at this point ....not knowing what lay underneath....did we miss any spots of Gel-coat..was there any air bubbles left...who knows...

Sunday, 21 October 2007

Separating the mold from the clinker...


The day eventually came round, when we decided to remove the mold...After all this work over such a long time... I had forgotten what we had actually done...
As luck would have it, some of my sons friends arrived out of the blue...they would come in handy...
It was'nt very pretty, but the way to start to release the mold... is to hammer it on all surfaces with a rubber mallet.
After this,a wedge of wood was partially forced between the two surfaces to force them apart...after doing this a few times the mold slightly lifted from the boat...
It was'nt until a length of strong rope was fixed to the nose of the mold and then levered against the bow,(using a six foot length of 3x3in) of the boat underneath...that there was a series of cracks..and the mold broke free...
Everybody then managed to get their fingers in between the two surfaces, and lifted..
There it was in all it's glory...The Mold...
It looked great....a few little blemishes here and there, but nothing to really bother about...the 10 coats of wax had done their job.


This called for a beer...in fact beers all round...
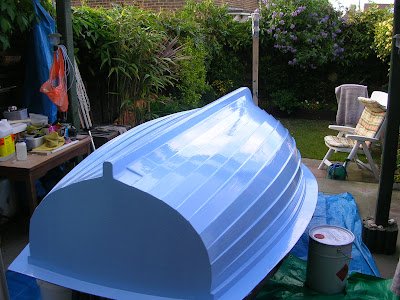
Saturday, 20 October 2007

Trim and Polish...

That sounds easy...trim and polish...
What that really means...is mark the flange of the mold with a scribe...and cut the flange to the required width, with an angle grinder...that's easy...

Then start to rub out any lumps and bumps with abrasive paper...when that was completed, after a few days...any crevices had to be filled with gel-coat...taped over and left to dry...then rub them down again...and when you think they are smooth enough, change to a smoother grade paper and...rub them down again ...and again...and again...gradually going through 240 wet and dry...400...800...and finally 1200...I've really gone off rubbing down by now...

With all the blemishes removed...and all the rubbing down now completed...you must say ''that is it''......it is......it's done....no more rubbing down..!
Only one more thing...the now dull surface of the mold, needed to be compounded up, to give it a good shine...


We are ready to go again...........Let's start at the very beginning....10 coats of wax...